Motivation
- I knew I was moving to a small, isolated town and would want something to keep me busy and get me away from the computer screen.
- I like making things, but I have clumsy hands, no artistic skills and a nerdy fondness for geometry. So, I like the idea of making things by precisely planning and measuring them, rather than needing to trust your artistic intuition as you go.
- I knew we might need things we wouldn’t be able to buy (furniture, etc.), and I liked the idea of being able to make whatever we needed.
- I dunno, woodworking was always something I’d wanted to do and this seemed like a good chance to explore that interest.
Training
The moment I realised all this, I was living in Phoenix and still had a few months before I’d be moving north. I managed to find a month-long introduction to woodworking course that was running in town and took it. In the course we made a simple bench, and in the process learned a bunch about the properties of wood, how to make different kinds of joints and how to set up, use and maintain various hand tools (chisels, planes, saws, etc.).
Equipment
I couldn’t buy tools in Phoenix (I already had to discard a ton of my stuff that wouldn’t fit in the car driving north). I had to wait until I got to Vancouver, at which point I had about a week to buy all the tools I thought I’d need, before the shipping company came to pick up our stuff and take it north.
Here’s what I brought up with me. The larger, powered and more specialised tools were bought, the more common tools (hammers, pliers, etc) were things Faye and I already had. Canada is close enough to the dark ages USA that construction-related units are all imperial.
- 3 Chisels (1/4,1/2 and 3/4 inch).
- A Taiwanese style jack plane (this one; it’s reputedly quite challenging to set up and use, but mechanical planes are crazy expensive and until I was sure what exactly I needed I didn’t want to drop that kind of money).
- A set of Japanese water stones for sharpening (220, 1000 and 4000 grit).
- A basic sharpening jig.
- A hand saw (15 inches long, one of the rip/cross combination saws).
- A coping saw (and extra blades).
- 3 Hammers (small, large and mallet).
- Set of pliers.
- Set of wrenches.
- Cordless circular saw.
- Cordless drill (and various bits).
- Cordless reciprocating saw (and various blades).
- A small free-standing table saw (pictured below).
- A bench vise (this one, they were out of the regular so I had to take the large).
- Two large bottles of wood glue
- A holdfast (just a metal hook, which you can hammer into a hole in your bench to hold a piece of wood, like this).
- A bunch of sand paper.
- A combination square.
- A tape measure.
- A marking gauge.
Local constraints
Wood. There’s not enough wood. There’s certainly no-one milling lumber anywhere within a few hundred kilometers. The nearest place to buy lumber is Norman Wells, which is 80km away and unconnected by road. It’s shipped in from the south and is crazy expensive.
Very little construction happens around town; there’s rarely new buildings and when there are they’re usually prefabbed in the south. That said, prefabbed buildings still need a little local construction to put together, so that sometimes brings a little left over lumber to town. Supplies come in to town on rare river barges in the summer and ice-road trucks in the winter. They arrive in ply-wood crates and on standard shipping pallets, that’s another source of wood.
Both the construction and shipping waste wood end up at the local dump (one of the town’s main attractions—seriously! More on the dump in another post). I’ve made a friend who regularly scours the dump for useful materials. After the week-overdue barge came in recently, we managed to salvage a whole bunch of 2×4 planks, 2×6 planks and plywood sheets.
Besides salvaging wood, I’m looking into the possibility of doing some local milling. More on that in a future post if it progresses.
The other thing that’s lacking around here is screws and nails. I didn’t bring any because I’d assumed you could buy them. I was wrong. The local store has a tiny supply of very, very expensive nails. No screws. We managed to salvage a few of these from the dump too, but for a while I think I’m mostly gonna have to rely on clever joinery and wood glue, which is a nice challenge.
Progress
The first order of business was to build a work bench from just a few pieces of scrap wood and some plywood. Luckily I had four almost-identically sized 4×4 posts which I could use for legs. I lapped them to inset two 2×4 “side” pieces on either side (laid vertically). The side piece were set deep enough that they came up to the same height as two 2×6 front/back pieces (laid horizontally), and then a sheet of plywood acts as the top. I also got sick of rummaging in a plastic bin for tools so put together one of those tool hanger boards on a piece of plywood.
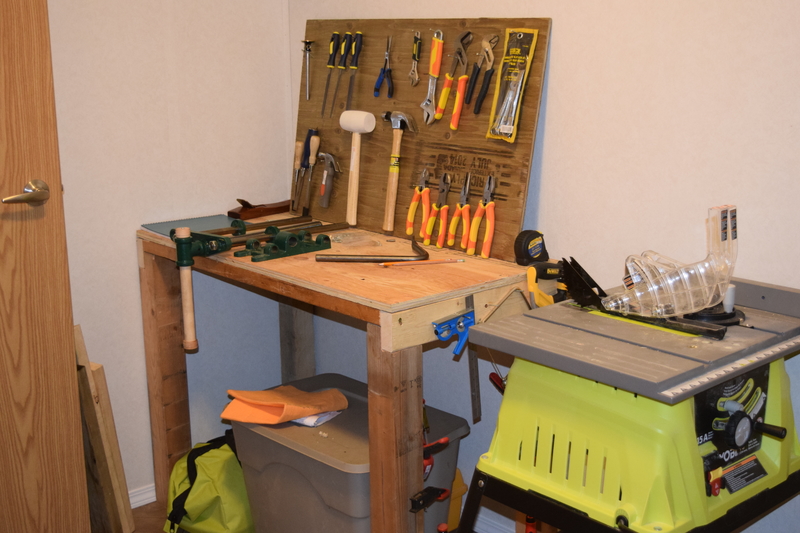
The horizontal 2×6 supports are important because they’ll give me a large, thick and secure enough surface to attach my bench vise to (you can see it lying on to of the bench currently).
Getting everything cut square and sized exactly right was quite a challenge without a flat, even surface to work on (everything outside is mud and rocks, inside is carpet or vinyl (or is it laminate?) which is flat(ish) but you can’t cut on it without risking floor damage). Still, I did it well enough, that after I had glued and screwed, the table was super stable and I decided it didn’t even need cross-braces. Great success.
Ambitions
Next up, I’ve got to make jaws for my vise (I’ve already got a couple of 2x6x18 plants for the job; wish it was hardwood but what can you do?) and mount it.
After that, I’m hoping to find a quick was to make shelves and stools out of pallets. I’m thinking of cutting dadoes in the thick planks to slide the thin ones into. We’ll see how that goes.
After that, I’m hoping to have accumulated enough wood (and long planks at that) that I can build a lean-to to store my snowmobile and bikes under before the winter comes…
Here’s the extra things I’m already wishing I had brought with me:
- A power sander (sanding a bench to by hand is no fun and does a poor job, and almost all the wood up here will be old, irregular and need fixing).
- Square-shaped drill bits (everything it square-shaped screws around here).
- Nails and screws (gonna bring a bucket of them back with me next time I’m south).
