Precise table saw depth

Written by:

Recently I’ve been finding myself needing to cut a bunch of precise-depth grooves and I’ve only got a table saw to do it with. The trouble is, grooves are square and a table saw is circular.

One easy solution is to set the depth of the saw (i.e, how much it sticks out above the table, which you can do precisely) and place the piece of wood end-down over the blade. That way you’re sure that at it’s highest point—the middle—the table saw only cuts exactly as deep as you want it to. Unfortunately lots of pieces of wood are too long or ungainly to cut end-on.

Another solution is to feed the end of your piece into the saw in a rip cut, and to simply stop (or better still, clamp another piece to the table to act as a stopper) when you get to the required depth. Then you’d just need to turn the piece over and repeat on the other side, and then chisel out the little pyramid you’ve left in the middle.

The trouble with this solution is that while you can easily see how far the saw has cut into the top of your piece, but the bottom is hidden. How do you know at which point on the top of your piece to stop cutting in order to get a precise depth of cut on the bottom?

I cranked out the old high-school trigonometry (who said it would never be useful!) to figure it out. I also made a handy graphic to explain.


saw

We know a few things:

  • r: the radius of our blade
  • h: the height of our piece of wood
  • d: the depth at which we’ve set the blade (i.e., how far it sticks out above the table

This lets us figure out:

  • r-d+h: how far above the center of the blade the bottom of our piece is
  • r-d+h: how far above the center of the blade the top of our piece is

Knowing these lets us draw some triangle and then use good old Pythagoras to solve for the base lengths:

  • \(r^2=x^2 + (r-d+h)^2\)
  • \(r^2=(x+y)^2 + (r-d)^2\)

Solving for x and then using that to solve for y will let you figure out precisely how far in to the bottom of your piece the saw has cut, given where it is cutting the top. Here’s some simplified formula to save you borrowing your kids’ math books:

From [top cut point] to [bottom cut point]:

\(y = \sqrt{d (2 r-d)}-\sqrt{(d-h) (2 r-d+h)}\)

From [middle of saw] To [top cut point]:

\(x = \sqrt{(d-h) (2 r-d+h)}\)

From [middle of saw] to [bottom cut point]:

\(x-y = \sqrt{(d-h) (2 r-d+h)}\)

So, for instance, say you had a 10 inch blade (r=5)  and wanted to cut a 3.5 inch piece of wood (h=3.5) and had extended 4 inches of the blade above the table (d=10). You’d have: x = 2.18, y = 2.72 and (x+y) = 4.9 inches. Say you wanted to cut exactly 6 inches into the piece, you’d know you needed to put a stopper exactly 1.1 inches beyond the horizontal center of the saw (just use a square to find and mark it) to get a perfect depth cut.

Preparing to woodwork

Written by:

Motivation

  • I knew I was moving to a small, isolated town and would want something to keep me busy and get me away from the computer screen.
  • I like making things, but I have clumsy hands, no artistic skills and a nerdy fondness for geometry. So, I like the idea of making things by precisely planning and measuring them, rather than needing to trust your artistic intuition as you go.
  • I knew we might need things we wouldn’t be able to buy (furniture, etc.), and I liked the idea of being able to make whatever we needed.
  • I dunno, woodworking was always something I’d wanted to do and this seemed like a good chance to explore that interest.

Training

The moment I realised all this, I was living in Phoenix and still had a few months before I’d be moving north. I managed to find a month-long introduction to woodworking course that was running in town and took it. In the course we made a simple bench, and in the process learned a bunch about the properties of wood, how to make different kinds of joints and how to set up, use and maintain various hand tools (chisels, planes, saws, etc.).

Equipment

I couldn’t buy tools in Phoenix (I already had to discard a ton of my stuff that wouldn’t fit in the car driving north). I had to wait until I got to Vancouver, at which point I had about a week to buy all the tools I thought I’d need, before the shipping company came to pick up our stuff and take it north.

Here’s what I brought up with me. The larger, powered and more specialised tools were bought, the more common tools (hammers, pliers, etc) were things Faye and I already had. Canada is close enough to the dark ages USA that construction-related units are all imperial.

  • 3 Chisels (1/4,1/2 and 3/4 inch).
  • A Taiwanese style jack plane (this one; it’s reputedly quite challenging to set up and use, but mechanical planes are crazy expensive and until I was sure what exactly I needed I didn’t want to drop that kind of money).
  • A set of Japanese water stones for sharpening (220, 1000 and 4000 grit).
  • A basic sharpening jig.
  • A hand saw (15 inches long, one of the rip/cross combination saws).
  • A coping saw (and extra blades).
  • 3 Hammers (small, large and mallet).
  • Set of pliers.
  • Set of wrenches.
  • Cordless circular saw.
  • Cordless drill (and various bits).
  • Cordless reciprocating saw (and various blades).
  • A small free-standing table saw (pictured below).
  • A bench vise (this one, they were out of the regular so I had to take the large).
  • Two large bottles of wood glue
  • A holdfast (just a metal hook, which you can hammer into a hole in your bench to hold a piece of wood, like this).
  • A bunch of sand paper.
  • A combination square.
  • A tape measure.
  • A marking gauge.

Local constraints

Wood. There’s not enough wood. There’s certainly no-one milling lumber anywhere within a few hundred kilometers. The nearest place to buy lumber is Norman Wells, which is 80km away and unconnected by road. It’s shipped in from the south and is crazy expensive.

Very little construction happens around town; there’s rarely new buildings and when there are they’re usually prefabbed in the south. That said, prefabbed buildings still need a little local construction to put together, so that sometimes brings a little left over lumber to town. Supplies come in to town on rare river barges in the summer and ice-road trucks in the winter. They arrive in ply-wood crates and on standard shipping pallets, that’s another source of wood.

Both the construction and shipping waste wood end up at the local dump (one of the town’s main attractions—seriously! More on the dump in another post). I’ve made a friend who regularly scours the dump for useful materials. After the week-overdue barge came in recently, we managed to salvage a whole bunch of 2×4 planks, 2×6 planks and plywood sheets.

Besides salvaging wood, I’m looking into the possibility of doing some local milling. More on that in a future post if it progresses.

The other thing that’s lacking around here is screws and nails. I didn’t bring any because I’d assumed you could buy them. I was wrong. The local store has a tiny supply of very, very expensive nails. No screws. We managed to salvage a few of these from the dump too, but for a while I think I’m mostly gonna have to rely on clever joinery and wood glue, which is a nice challenge.

Progress

The first order of business was to build a work bench from just a few pieces of scrap wood and some plywood. Luckily I had four almost-identically sized 4×4 posts which I could use for legs. I lapped them to inset two 2×4 “side” pieces on either side (laid vertically). The side piece were set deep enough that they came up to the same height as two 2×6 front/back pieces (laid horizontally), and then a sheet of plywood acts as the top. I also got sick of rummaging in a plastic bin for tools so put together one of those tool hanger boards on a piece of plywood.

bench_medium

The horizontal 2×6 supports are important because they’ll give me a large, thick and secure enough surface to attach my bench vise to (you can see it lying on to of the bench currently).

Getting everything cut square and sized exactly right was quite a challenge without a flat, even surface to work on (everything outside is mud and rocks, inside is carpet or vinyl (or is it laminate?) which is flat(ish) but you can’t cut on it without risking floor damage). Still, I did it well enough, that after I had glued and screwed, the table was super stable and I decided it didn’t even need cross-braces. Great success.

Ambitions

Next up, I’ve got to make jaws for my vise (I’ve already got a couple of 2x6x18 plants for the job; wish it was hardwood but what can you do?) and mount it.

After that, I’m hoping to find a quick was to make shelves and stools out of pallets. I’m thinking of cutting dadoes in the thick planks to slide the thin ones into. We’ll see how that goes.

After that, I’m hoping to have accumulated enough wood (and long planks at that) that I can build a lean-to to store my snowmobile and bikes under before the winter comes…

Here’s the extra things I’m already wishing I had brought with me:

  • A power sander (sanding a bench to by hand is no fun and does a poor job, and almost all the wood up here will be old, irregular and need fixing).
  • Square-shaped drill bits (everything it square-shaped screws around here).
  • Nails and screws (gonna bring a bucket of them back with me next time I’m south).


Packing & Relocation

Written by:

Great news: our household belongings have arrived!

If we had been more organized, we would have started this blog before moving up North, and then there probably would have been dozens of posts on our packing and relocation process. But instead, you get the short version:

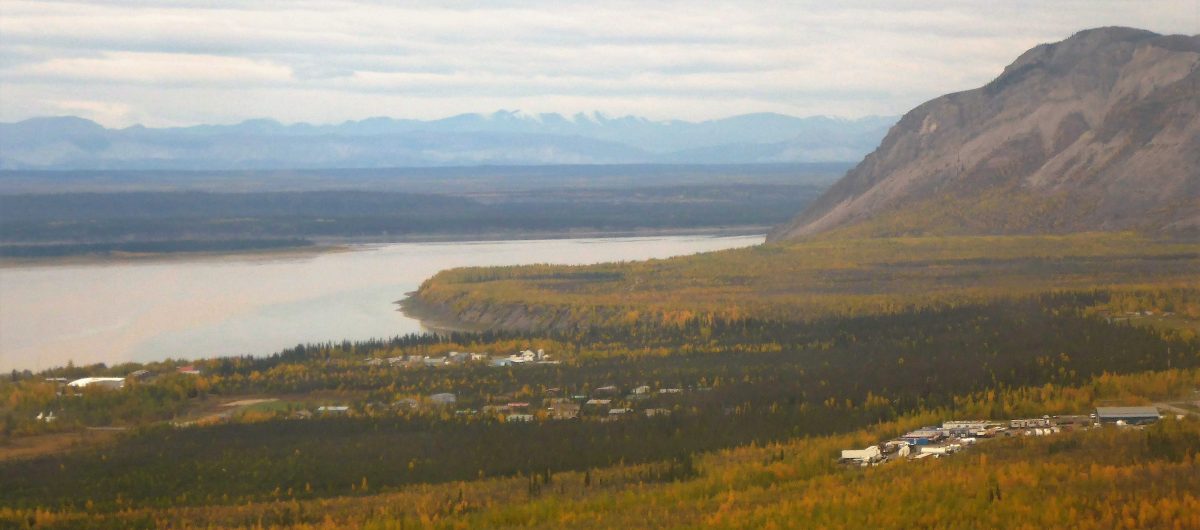
As you probably already know, Tulita is a small, remote, isolated hamlet in the middle of the Northwest Territories. The ways that things can be transported here include the ice roads in the winter (from ~Jan-Mar), on one of the few barges that come up the Mackenzie River in the summer, or via a very expensive flight. As you might imagine, this means that moving personal belongings up here is an expensive and logistically difficult exercise. My job offered a relocation package, including movers coming to pack up all of our stuff and bringing it up to Tulita. This was great and made it possible to move up here for a prolonged period of time, but brought up an interesting conundrum: we now had one shot to bring everything we thought we might need for the next several years to a location that we had never even set foot in before.

What will the local store sell? What new hobbies will we take up? What city luxuries can we not go without? How much warm clothing is enough? These are the questions we’ve been puzzling over for the past few months. Clearly now was the logical time to drop some money, but we also didn’t want to end up with a bunch of stuff we were never going to use. Some tough choices were made. We’ve only been here two weeks now, so it remains to be seen what turns out to be our good and bad purchasing decisions.

Here are some of the things we bought…

Transportation

Excitingly, we bought a snowmobile! This was by far our largest purchase. We bought it from Ryan, who is leaving my position at Parks. Neither Maciek nor I have ever ridden a snowmobile before, so this is very exciting. Ryan showed us how it works, but we’re still going to put major effort into maintaining it, repairing it and not crashing it.

We already owned bicycles and shipped those up. I brought my snowshoes and AT skis, and Maciek bought snowshoes. We both plan to buy cross-country skis, but everywhere was out of stock when we were looking, so we’ll have to buy them online and have them sent in. We looked into canoes and kayaks, but they are expensive and we were unsure of how much we’d use them, so we decided to put that purchase off until a later date. The ice roads are only open for a small portion of the year, so we quickly opted away from the idea of buying a truck.

Weather-Appropriate Clothing

I was feeling pretty satisfied with my existing clothing selection, but Maciek was coping with his fear of the cold with impulse shopping. Several wool base layers, wool socks, wool scarves, wool mid-layers, down mid-layers, synthetic mid-layers, rain pants, hut booties, a giant down parka, and the warmest mitts he could find later and he’s feeling a bit more confident. I got a fairly serious down layer and some heavy-duty gloves, but I also get a lot of my clothing provided by work since Parks staff wear uniforms. We also got some bug jackets, and we still need to get some more serious winter boots, because they don’t really sell those in Vancouver.

Housewares & Kitchenwares

Our house in Tulita was furnished by Parks, and we already owned a bunch of this stuff (including a slow cooker, a juicer, and a dehydrator), so much of this category was already taken care of. We got a nice office chair for Maciek and other assorted things such as storage bins, a cooler, a blender, a coffee grinder, a kettle, hangers, canning jars, and a Joy of Cooking.

Food

In anticipation of the higher costs and reduced selection of foodstuffs in Tulita, we stocked up on non-perishable staples and spices and seasonings that we didn’t anticipate finding up North.

Outdoor Recreation

We heard that some of the main outdoor activities here are hunting and fishing. I have my firearms license already, and Maciek had completed the course, so we bought a .22 caliber rifle. This will be sufficient for target practice and small game, but nothing larger than that. You need to be a Northwest Territory resident for a year before you’re allowed to hunt big game anyways, so this should be good practice in the meantime. We still need to get fishing gear.

Although not exclusively in the outdoor recreation category, we got an entry-level DSLR camera (Nikon D3200) that we’re starting to play around with. Hopefully we’ll be able to get some good northern lights shots this winter.

Indoor Recreation

We bought a 50” TV. Also a Dance Dance Revolution mat – Maciek assures me that we don’t need a game console for this and that he can find a way to run it on Linux. We added to our board game collection a bit with the addition of Carcassonne, Arkham Horror, and Codenames. We got some basic at-home fitness equipment, including an inflatable ball, ab roller, gymnastics rings, gliding disks, and some light free weights. There’s a very nice fitness centre in town with all sorts of equipment.

Also, I got a fiddle. No, I do not currently know how to play the fiddle. That’s what YouTube and good household soundproofing is for.
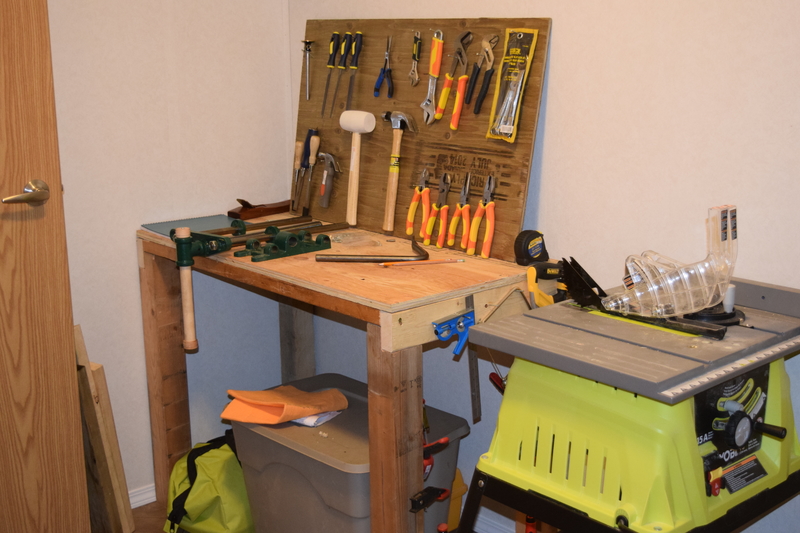
Tools

Maciek decided that one of his northern hobbies is going to be carpentry, so he bought a whole bunch of woodworking tools. I was going to list them here, but he says that my list is incomplete and that he wants to write a whole separate blog post about his tools, so you’ll have to wait for that.

~~~

All this planning and researching and shopping has kept us busy. Our last few weeks in Vancouver were spent shopping at Walmart, Costco, Famous Foods, Lee Valley Tools, Fitness Depot, Reliable Gun, MEC, REI, Arcteryx, 3 Vets, Deakin, Icebreaker, Steep & Cheap, Gourmet Warehouse, Canadian Tire, Best Buy, Amazon, Craigslist, and assorted music stores, cheese stores, board game stores, etc.

Needless to say, we’re sick of shopping, and right now the idea of one small store with limited supply feels like a nice change.

The movers came and packed all of this up and took it away. That was three weeks ago. In the meantime, we’ve only had fairly limited personal possessions. The original estimate was that our stuff wasn’t supposed to arrive until August 26th, so we were pretty excited to get it a week early. Everything was packed in boxes and packing paper, so it was basically like Christmas morning, unwrapping all of our shiny new toys.